21st Century Accounting Tutorials - Payroll
How do I enter a Timecard?
In Payroll/Timecards you can enter hours worked, jobs or departments worked in, and the hours taken as vacation, sick leave, comp time or any accrued time that your employees report on their timesheets. Enter pieces for piece rate incomes and sales amounts for sales commissions. You might also enter one-time pay amounts such as, for example, expense reimbursements, savings plan payouts, and bonuses.You can also create new Recurring Timecards in the Recurring Timecards window. But let's start with the Timecards window when no Recurring Timecards have been created.
To read more about using Timecards, start 21st Century and go to Help/Contents/Special Tasks/Payroll/Creating and Using Timecards. For information at any field in the Timecards window, press F1: Help.
Follow these steps.
- Run Payroll/Timecards. When there are no active Timecards or Recurring Timecards, the cursor is already in the employee ID field, ready to receive an employee ID and bring up that employee's Timecard.
- Type 2002 and press the Tab key.
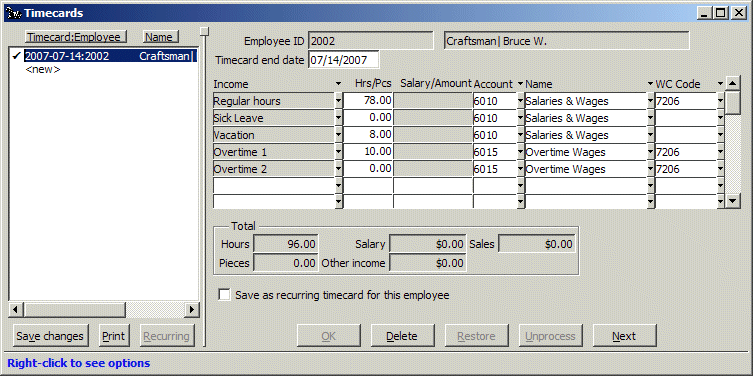
- At Timecard end date, enter 071407.
- Tab down to the Timecard data grid and enter the following.
This employee worked —
78 regular hours
10 overtime hours at Overtime 1 (time and a half, using X 1.5 multiplier)
0 overtime hours at Overtime 2 (double time, using X 2 multiplier)The employee also took —
8 vacation hoursHe did his primary type of work all week, so the same WC Code, 7206, applies to all his regular and overtime hours. If he ever works at a job with a different WC classification from his primary job, you enter that job, hours, and WC Code as another line on the Timecard. (Both jobs must be assigned to him in Configure/Employees.)
NOTE: The G/L account distributions entered in the Timecards window override any other distributions, for the same incomes, explicit or implicit, that may exist in Payroll. - Click OK to save your work so far.
Here is the completed Timecards window for Bruce.

- Click Save changes to save the Timecard.
Now when you run Calculate Payroll in this company —
and click OK for the Current Payroll year of 2007
and click Semimonthly and enter Start and End dates of 7/1/07 - 7/15/07,
then if Timecards exist with End dates that are before or on
the End date of the selected pay frequency, Calculate Payroll
uses those Timecards to calculate payroll for employees in that frequency.
In other words, the Calculate Payroll semimonthly pay frequency end date of 7/15/07 will cause Bruce's semimonthly Timecard with an end date of 7/14/07 to be included in the pay run.
Calculate Payroll always uses the relevant information in your Payroll pay factor configurations plus the entries on Timecards with qualifying dates to calculate payroll. For correct pay runs, make sure your Payroll factor configurations are up-to-date and correct.
When the company is departmentalized
Before we leave Timecards, let's look at a Timecard that better illustrates the power and flexibility of the Timecards function. This Timecard is for illustration only. It doesn't exist in the sample data.
This company has been departmentalized. Bruce's work week is split between two departments, Maintenance and Acquisitions.
- "Departmental Bruce" worked —
45 regular hours in Maintenance (his home department)
33 regular hours in Acquisitions
10 overtime hours at Overtime 1 (time and a half, using X 1.5 multiplier) in Maintenance
6 overtime hours at Overtime 1 (time and a half, using X 1.5 multiplier) in Acquisitions
0 overtime hours at Overtime 2 (double time, using X 2 multiplier)The employee also took —
8 vacation hours, always distributed to Maintenance (his home department)He did his usual type of work in both departments, so the same WC Code, 7206, applies
- The completed Timecard shows the distribution of
payroll expenses for his time to the G/L accounts
assigned to the departments he worked in.

- After Calculate Payroll processes Timecards, you can click
the Distribution tab in the Calculate Payroll window for details.
The distribution of the Timecard above would look like this:

Back To Top | Back To Main Tutorials Page
