21st Century Accounting Tutorials - Payables
Entering a Vendor Invoice
Once you have set up Payables Vendors, you're ready to start recording the purchase of products and services from your Vendors.
Run Payables/Vendor Invoices.

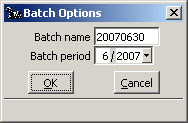
All data entry sessions that create batches open with the Batch Options window. You establish the posting period and name for the batch, both of which initially default to today's date. You can enter any open period for posting and name the batch anything you like, up to eight characters.
Batch name and Batch period. Click OK to accept the defaults.

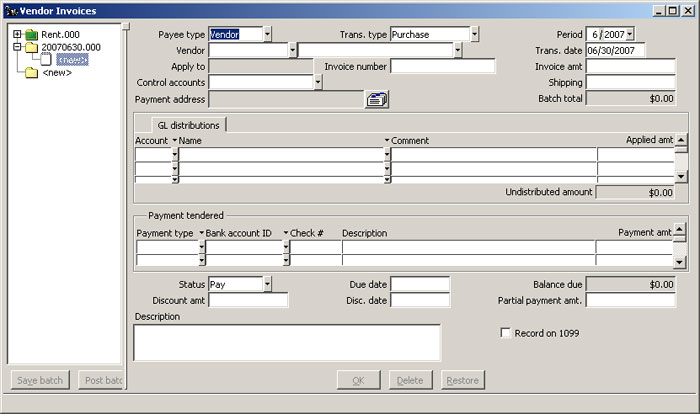
Payables: Vendor Invoices window, Add New Invoice
The cursor moves into the Payee type field in the new invoice window. You can press the F6 key to move back into the left pane.
Payee type. Select Vendor and press the Tab key.
The choices for Vendor type are "Vendor," for the regular Vendors you set up in Payables/Configure/Vendors, and "Occasional," or walk-ins and other Vendors whose business in not frequent enough to justify setting them up as regular Vendors. For best use of the software, enter all your regular Vendors into the system. Do not use "Occasional" for Vendors you expect to do business with frequently.
Trans type. Select Purchase and press Tab.
The choices for Transaction type are "Purchase," "Credit Memo," and "Debit Memo."
Period. Press Tab twice to leave the displayed period.
When you enter a batch of Vendor invoices, you can change the posting period and transaction date of individual invoices, since you may be entering a pile of invoices that you received over a period of days.
Vendor ID. Type gil and press Tab. (Or select Gilbert, William S. from the Selector list.) Press Tab until you come to the Invoice Amt field.
"Apply to" is used optionally to apply credit and debit memos to existing invoices. The system will supply a default invoice number if you do not assign a number.
Invoice Amt. Enter 599.95.
For a purchase, you enter the total amount due from the vendor's invoice. You would enter a credit memo amount as a negative amount (precede with a minus sign).
Control accounts. You can select any control account set, from those you’ve set up, for posting any particular vendor invoice. Select Accts Payable from the drop-down list.
Shipping. Enter 50.00 and press Tab twice.
You can enter the amount of the invoice that was charged for shipping. Any invoice amount (such as shipping charges) in this field will be excluded from calculation of the vendor's discount. The system subtracts the shipping amount from the invoice total to get the discount base.
The Payment address is correct.
GL distributions. Press Tab to the end of the line to distribute the full amount of the invoice to the insurance expense account.
Since you set up and assigned a default account prompt set to this vendor, you can distribute to the automatically displayed account. Use the drop-down list to select other distribution accounts, if required.
When the Vendor does NOT have assigned distribution accounts, you must distribute the purchase expense manually.
Tab through the Payment tendered fields (Press F1 at fields you want more information about):
In this case, no payment is entered at the time of invoice entry. You are finished with this invoice.
Tab through the remaining fields (Press F1 at fields you want more information about):
Status (Pay, Hold, and so forth)
Due date (calculated using invoice date and terms, if any)
Discount amt (calculated using invoice date and terms, if any)
Discount date (calculated using invoice date and terms, if any)
Partial payment amt. You can enter a partial payment amount if you do not want to pay the invoice off automatically. Say that you want to make regular partial payments against the invoice, such as, for example, monthly installment payments on a large purchase.
Description (prints on invoice)
Record on 1099. You can indicate whether payment on this particular invoice should be recorded as a 1099 payment. Then, when you post a payment on the vendor invoice, the actual payment amount is recorded as a 1099 payment to the vendor.
Click OK.

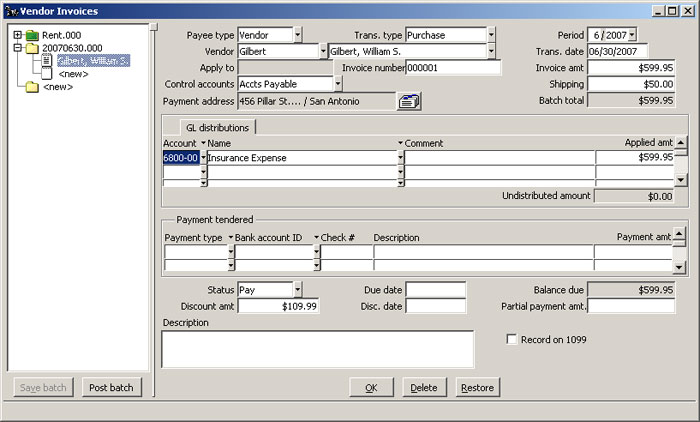
Payables: Vendor Invoices window, New Vendor Invoice Saved
At this point, you can enter more invoices or post this one. If you enter multiple invoices, save the batch periodically.
To print a batch listing, right-click on the batch name in the left pane and select Print batch listing.
When you are done, click the Post batch button.
Back To Top | Back To Main Tutorials Page
